 |
OpenGL ES SDK for Android
ARM Developer Center
|
|
OpenGL ES SDK for Android
ARM Developer Center
|
This tutorial introduces the idea of mipmapping and compressed textures.
Bandwidth is one of the major issues to contend with when developing for mobile. Bandwidth is a limited resource compared to desktop and is something many desktop developers struggle with. Instead of having 100s of gigitabits per second you are now reduced to a more modest figure of around 5. Also bandwidth is a serious drain of battery power. These are some of the reasons why you want to reduce it as much as you can. This is what this tutorial is about and it will talk you through 2 different bandwidth saving techniques: Mipmapping and Compressed Textures. It is assumed that you have completed the Texture Cube tutorial and completing the Android File Loading tutorial will be helpful.
Let's say that you have uploaded a series of textures for your application (for more information on how to do this see the Texture Cube tutorial). You want to use fairly high quality textures so each of your textures is at least 512 x 512 pixels. The problem is that sometimes the object that you use this texture on, may not be 512 x 512 pixels on the screen. In fact if the object is far away then the chances are it may not even be 100. At the moment OpenGL ES will take the 512 pixel texture and try to fit it onto 100 pixels at runtime. You can of course choose to optimize this selection with either quality or speed in mind but you still have to send the whole texture to the GPU.
Wouldn't it be good if you could have the same texture in a series of sizes say 512 x 512, 256 x 256, 128 x 128 and so on. All produced offline so that they could be of the best possible quality. OpenGL ES then just uses the closest one to the actual size of the object. This is exactly what mipmapping is and can not only remove unnecessary bandwidth from your scene, but also improve the quality of your scene.
This is such an important feature of OpenGL ES, that there is a function that is provided for you that will automatically generate mipmaps for you. Note, to use it, the width and height of your texture must be a power of 2. The only thing you need to provide is the target that you are using. If you have been following the tutorials up until now the only one you have used is GL_TEXTURE_2D
The rest of this tutorial assumes you want to load your mipmapped textures manually.
First of all lets have a look at the texture upload function from the textures file:
We have modified the function to take in the file name of the texture as well as the level, width and height. This was done because we need to load a series of textures using the same function. When defining your textures for mipmapping manually you need to use the level argument in your glTexImage2d call. Your base texture which in the above example would be 512 x 512 is known as level 0. That is why up until this point we have always supplied 0 as the second parameter.
OpenGL ES expects each level in a texture to be half the size of the original one. So level 0 is 512 x 512, level 1 is 256 x 256, level 2 is 128 x 128 etc. This must go down to and include a 1 x 1 texture. If you don't supply all levels then OpenGL ES regards the texture as incomplete and it will produce errors.
Another thing to note is that we have changed the glTexParameters now to include mipmapping. We use GL_NEAREST_MIPMAP_NEAREST. This means that it uses the mipmapping level nearest to the size of the object without any interpolating between the two and also uses the pixel nearest to the desired pixel in the texture, again with no interpolating. For better looking images you can use GL_LINEAR_MIPMAP_LINEAR, but you will be sacrificing performance.
This code is now found in the setupGraphics function. We needed to pull out the generation of textures as each of the mipmap levels needs to refer to the same texture ID. We are generating two ID's because we will use the second one for the compressed textures later on. As you can see we call the loadTexture function 10 times each with a different texture for each level. As mentioned earlier we go all the way down to a texture of the size 1 x 1.
We added these texture files using the asset manager in the Android SDK. If you need help on how to do this correctly please consult the Android File Loading tutorial.
For this tutorial we won't be using the spinning cube instead we are just going to use a single square that moves further away and closer to the screen. As the square gets bigger on the screen the mipmap level will change to a more appropriately sized texture. As a result we can remove a lot of the indices, texture coordinates and the vertex code.
As we are moving the object further away we need to adjust the Zfar distance in the matrixPerspective call. As otherwise the object will get clipped before it shows some of the mipmap levels.
We need to include a few new globals to this tutorial as well. There is no need for the angle global as we have removed all of the rotation. Instead we do need to add: a distance global, a velocity global that shows how much to increase or decrease the distance by, and an integer used as a toggle that shows whether we are using compressed textures or not.
Now we need to edit the translate function to take into account of our new distance variable and to remove the rotation functions as angle doesn't exist anymore.
The final adjustment is all about how we move the object at the end of the frame. We provide a range of acceptable values and once the distance falls outside of these, we toggle whether we are using compressed textures and the sign of the velocity to make the object move in the opposite direction. Notice how we change the sampler location from 0 to compressed. This will be discussed in the compressed textures section below.
The second bandwidth saving feature we are discussing today is compressed textures. You may have a big file that you want to send to a colleague. A sensible step in sending this file is to compress it first, maybe into a zip format, in doing so you can reduce the file size considerably. The same is true for textures. We can provide OpenGL ES with a compressed version of a texture that can have a much smaller file size than the uncompressed version there by saving a lot of bandwidth.
The compression format that we are going to use in this example is Ericsson Texture Compression or ETC. There are others to choose from but this one works on the most GPU's. Going into the future with OpenGL ES 3.0 and beyond the new compression format will be ASTC. This can give greater compression results than ETC but not all devices support it yet so we are sticking with ETC in this tutorial.
The first job is to compress your textures. There are many tools available to use to do this for you but we use the Mali Texture Compression Tool. Unfortunately a lot of software doesn't support opening .raw files as the format doesn't include the width and height of the image. So it is recommended that you convert your images to a more common format: bmp, png or jpeg works just fine.
Open your textures in the tool and then click compress selected images. A dialog box should appear. Change the tab to ETC1/ETC2. Make sure PKM, slow, ETC1 and perceptual are selected and then press ok. The tool should then produce a .pkm file for each of your textures that you selected. These are the compressed textures that you are going to use, it's as simple as that. If you don't want to generate your mipmap levels by hand, this tool can also generate mipmaps for you. All you have to do is give it the original texture, select a compression method and then tick the box that says generate mipmaps. Note how there is also an ASTC tab on the dialog box. This tool also supports compressing textures using the new ASTC standard.
If you look at the pkm files that have been generated they should be much smaller than the originals.
Now we need to load our compressed textures into OpenGL ES. For this we have generated a new texture loading function.
Unfortunately this needs to be a bit more complicated because we are no longer using the easy raw format. The ETC file format has a 16 byte header that we load first of all and place into a new pointer called textureHead. The format of the 16 byte header is displayed below:
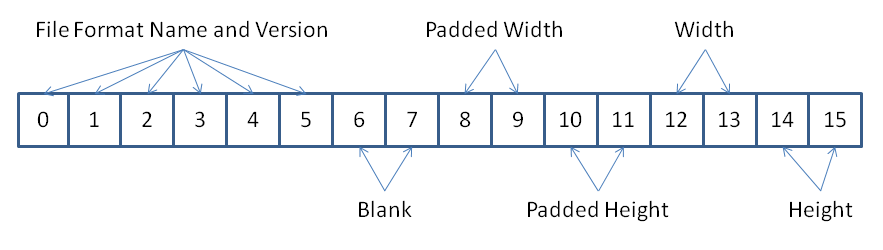
The first 6 bytes are the name of the file format and the version that the file is. We don't need to worry about this, as what we are interested in is the padded width, padded height, width and height. Each of these are stored over 2 bytes. For this reason we convert them into unsigned shorts by shifting the most significant byte 8 places and then combining it with the least significant byte using a bitwise or.
The padded width and height can differ from the actual width and height because ETC works on a block of 4 at a time. So if your width and height are not multiples of 4, the padded value will be the width or height rounded up to the nearest multiple of 4.
We then use this value in our malloc call shifted right by 1 as ETC allocates half a byte per pixel. The final change in the code is the use of glCompressedTexImage2d instead of glTexImage2D. The parameters are very similar the differences are on the internal format we use GL_ETC1_RGB8_OES which is the internal type for ETC1. The only new field is the imageSize field which we fill in with the exact same calculation as the malloc described above. That is all there is to it if you want to use compressed textures.
There is only a little bit of work left to do and that is to call the above function with all of the compressed textures we have generated. Again we use the technique described in the Android File Loading tutorial to package the compressed textures inside the apk and to extract them again.
Notice how we call glActiveTexture with GL_TEXTURE1 and then bind the second texture ID to it. This means we have all the original textures on GL_TEXTURE0 and all the compressed textures on GL_TEXTURE1. We mentioned that we have a variable known as compressed which gets toggled in the frame. This means we can use this value to determine which texture unit to load from, just like we did in the glUniform1i call earlier. When you run the application you should see a square that goes further into the distance. The first texture you should see has a 0 on it. The textures should then count up to 5. Each number responds to the mipmap level that OpenGL ES is currently using. The square should then move closer again counting down from 5 to 0. That is all there is to compressed textures and mipmapping use these new techniques to reduce the bandwidth in all your applications.
Follow the Getting Started Guide from Building Android samples onwards to build and run the application.

