|
CMSIS-RTOS2
Real-Time Operating System API
|

|
|
CMSIS-RTOS2
Real-Time Operating System API
|
|
This sections explains concepts for using CMSIS-RTOS2 interface. They are recommeded to follow for best reusability of the software across different platforms.
Note
- For the guidance on migration from CMSIS-RTOS API v1 to CMSIS-RTOS2, see section Detailed API Function Differences in CMSIS 5 documentation.
The CMSIS-RTOS2 defines APIs for common RTOS services as listed below:
The referenced pages contain theory of operation for corresponding services as well as detailed API description with example code.
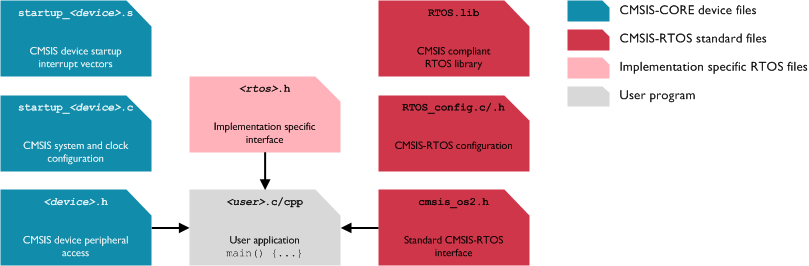
The CMSIS-RTOS2 interface is provided in cmsis_os2.h file - a standard C header file that user applications and middleware components need to include to access CMSIS-RTOS2 API. It contains all the function declarations, as well as type and macro definitions.
An implementation specific header file (rtos.h in the picture below) provides access to such definitions. Using the cmsis_os2.h along with dynamic object allocation allows to create source code or libraries that require no modifications when using on a different CMSIS-RTOS2 implementation.
Once the files are added to a project, the user can start working with the CMSIS-RTOS functions.
CMSIS-RTOS2 is especially easy use to integrate in projects that support CMSIS-Pack format. CMSIS-RTOS2 is provided in the CMSIS 6 Software Pack as a software component in form of a central API defintion It is part of component class CMSIS and belongs to component group RTOS2.
CMSIS-RTOS2 follows the general CMSIS coding rules. Additionally following Namespace prefixes are used in CMSIS-RTOS2 API:
os for all definitions and function names. Examples: osThreadPrivileged, osKernelStart.os with postfix _t for all typedefs. Examples: osStatus_t, osThreadAttr_t.When program execution reaches main() function there is a recommended order to initialize the hardware and start the kernel.
Your application's main() should implement at least the following in the given order:
app_main) using osThreadNew, which will be used as a main thread . This thread should take care of creating and starting objects, once it is run by the scheduler. Alternatively, threads can be created directly in main().osKernelStart will not be executed.Note
- Modifying priorities and groupings in the NVIC by the application after the above sequence is not recommended.
- Before executing osKernelStart, only the functions osKernelGetInfo, osKernelGetState, and object creation functions (osXxxNew) may be called.
Code Example
All RTOS objects share a common design concept. The overall life-cycle of an object can be summarized as created -> in use -> destroyed.
An RTOS object (thread, timer, flags, mutex, etc.) is created by calling its osXxxNew function (for example osThreadNew, osTimerNew, osEventFlagsNew, etc). The new function returns a numeric identifier that can be used to operate with the new object.
The actual state of an object is typically stored in an object specific control block. The memory layout (and size needed) for the control block is implementation specific. One should not make any specific assumptions about the control block. The control block layout might change and hence should be seen as an implementation internal detail.
In order to expose control about object specific options all osXxxNew functions provide an optional attr argument, which can be left as NULL by default. It takes a pointer to an object specific attribute structure, commonly containing the fields:
name to attach a human readable name to the object for identification,attr_bits to control object-specific options,cb_mem to provide memory for the control block manually, andcb_size to quantify the memory size provided for the control block.The name attribute is only used for object identification, e.g. using RTOS-aware debugging. The attached string is not used for any other purposes internally.
The cb_mem and cb_size attributes can be used to provide memory for the control block manually instead of relying on the implementation internal memory allocation. One has to assure that the amount of memory pointed to by cb_mem is sufficient for the objects control block structure. If the size given as cb_size is not sufficient the osXxxNew function returns with an error, i.e. returning NULL. Furthermore providing control block memory manually is less portable. Thus one has to take care about implementation specific alignment and placement requirements for instance. Refer to Memory Management for further details.
After an object has been created successfully it can be used until it is destroyed. The actions defined for an object depends on its type. Commonly all the osXxxDoSomething access function require the reference to the object to work with as the first xxx_id parameter.
The access function can be assumed to apply some sort of sanity checking on the id parameter. So that it is assured one cannot accidentally call an access function with a NULL object reference. Furthermore the concrete object type is verified, i.e. one cannot call access functions of one object type with a reference to another object type.
All further parameter checks applied are either object and action specific or may even be implementation specific. Thus one should always check action function return values for osErrorParameter to assure the provided arguments were accepted.
As a rule of thumb only non-blocking access function can be used from Interrupt Service Routines (ISR). This incorporates osXxxWait functions (and similar) limited to be called with parameter timeout set to 0, i.e. usage of try-semantics.
Objects that are not needed anymore can be destructed on demand to free the control block memory. Objects are not destructed implicitly. Thus one can assume an object id to be valid until osXxxDelete is called explicitly. The delete function finally frees the control block memory. In case of user provided control block memory, see above, the memory must be freed manually as well.
The only exception one has to take care of are Threads which do not have an explicit osThreadDelete function. Threads can either be detached or joinable. Detached threads are automatically destroyed on termination, i.e. call to osThreadTerminate or osThreadExit or return from thread function. On the other hand joinable threads are kept alive until one explicitly calls osThreadJoin.
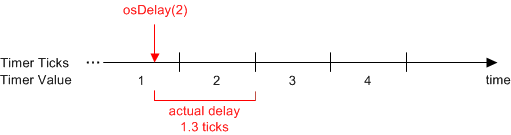
Timeout value is an argument in many API functions that allows to set the maximum time delay for resolving a request. The timeout value specifies the number of timer ticks until the time delay elapses. The value is an upper bound and depends on the actual time elapsed since the last timer tick.
Examples:
The following CMSIS-RTOS2 functions can be called from threads and Interrupt Service Routines (ISR):
Functions that cannot be called from an ISR are verifying the interrupt status and return the status code osErrorISR, in case they are called from an ISR context. In some implementations, this condition might be caught using the HARD_FAULT
The CMSIS-RTOS2 API offers two options for memory management the user can choose. For object storage one can either use
In order to affect the memory allocation scheme all RTOS objects that can be created on request, i.e. those having a osXxxNew function, accept an optional osXxxAttr_t attr argument on creation. As a rule of thumb the object attributes at least have members to assign custom control block memory, i.e. cb_mem and cb_size members. By default, i.e. attr is NULL or cb_mem is NULL, Automatic Dynamic Allocation is used. Providing a pointer to user memory in cb_mem switches to Manual User-defined Allocation.
The automatic allocation is the default and viable for many use-cases. Moreover it is fully portable across different implementations of the CMSIS-RTOS2 API. The common drawback of dynamic memory allocation is the possibility of memory fragmentation and exhaustion. Given that all needed objects are created once upon system initialization and never deleted at runtime this class of runtime failures can be prevented, though.
The actual allocation strategy used is implementation specific, i.e. whether global heap or preallocated memory pools are used.
Code Example:
The Mutexes in this example are created using automatic memory allocation.
One can get fine grained control over memory allocation by providing user-defined memory. The actual requirements such user-defined memory are kernel-specific. Thus one needs to carefully refer to the size and alignment rules of the implementation used.
Code Example:
The above example uses user-defined memory for the mutex control block. For this mutex_cb is defined with the control block type provided by the kernel header file rtx_os.h from CMSIS-RTX RTOS kernel.