 |
OpenGL ES SDK for Android
ARM Developer Center
|
|
OpenGL ES SDK for Android
ARM Developer Center
|
A quick introduction to the programmable graphics pipeline introduced in OpenGL ES 2.0.
This series of tutorials is going to focus on programmable graphics APIs. What does this mean? OpenGL ES 2.0 was the first OpenGL ES version to support a programmable graphics pipeline. Prior to this, we had OpenGL ES 1.x. OpenGL ES 1.x is a fixed function mobile graphics API. A fixed function graphics API allows you to specify various bits of data (positions, colours, etc.) for the GPU to work on, and a strict set of commands for using that data.
For example, you can tell the GPU that you have a polygon in your scene, specify the reflectance of the material for that polygon, and add a light to the scene. The GPU will then go a away and calculate what colour the polygon will appear in your scene.
This is great for simple scenes and allows you to very quickly achieve some very nice looking graphical effects.
However, what happens when you want to use a different lighting equation that the one built in to the API? What if you come up with a great new graphics technique but the API doesn't support it? (e.g. frame buffer objects, cube maps, etc.). You're very dependent on the contents of the API; there are a fixed set of functions and those functions have a limited number of options. This is never going to cover all the things you might want to do as a developer. And although the API can be extended to support more options and more techniques, you're then dependent on GPU vendors implementing those extensions.
That's where fixed function graphics pipelines fall short. Instead of creating hundreds of extensions and functions to support all requested use cases, programmable pipelines were created. A programmable pipeline allows the developer to provide custom code that is run on the GPU at various stages of the pipeline. Each piece of code is called a shader, and since they can contain arbitrary code it means the developer is free to do (almost) whatever they like.
Of course, all this freedom comes with a price. Since there are no default shaders in OpenGL ES 2.0 you must always write your own. This means that features like lighting, texturing, and others that are "free" (in terms of developer effort) in OpenGL ES 1.1 must now be programmed explicitly by the developer.
It's worth mentioning that OpenGL ES 1.x and OpenGL 2.0 onwards cannot be mixed and OpenGL ES 2.0 is not backwards compatible. In other words, it's all or nothing when choosing fixed function vs. programmable.
Since shaders are C-like programs which run on a GPU, you may be thinking, "how do I compile these shaders?". Because each GPU vendor (and sometimes each GPU) has a different instruction set we need a way to compile the shaders for every different device.
Thankfully this is possible in OpenGL ES using "online" compilation. You provide the source code for you shaders to the OpenGL ES API at runtime and the OpenGL ES driver uses a compiler on the device itself to compile your code for instruction set of the device.
Shaders work together in programs. This is similar to what happens when compiling normal C code: you compile your source to object files (.o) and then link them together into an executable. Here, you compile you shaders, add them to a program and then link them together.
This leaves you with a program object which you can use in your application.
The downside here is of course that anybody who wants to will be able to see you shader code which will contain your top secret super-fancy graphics techniques. In the interest of keeping your shader source code propriety, most GPU vendors also provide an "offline" compiler which can generate binaries for their particular platform. These binaries can then be shipped with you application and loaded using the OpenGL ES API at runtime. You will have to create and ship binaries for each platform you wish to run on and pick the correct one.
You can load binaries by swapping glShaderSource above for glShaderBinary.
A diagram of the OpenGL ES 2.0 pipeline can be found below.
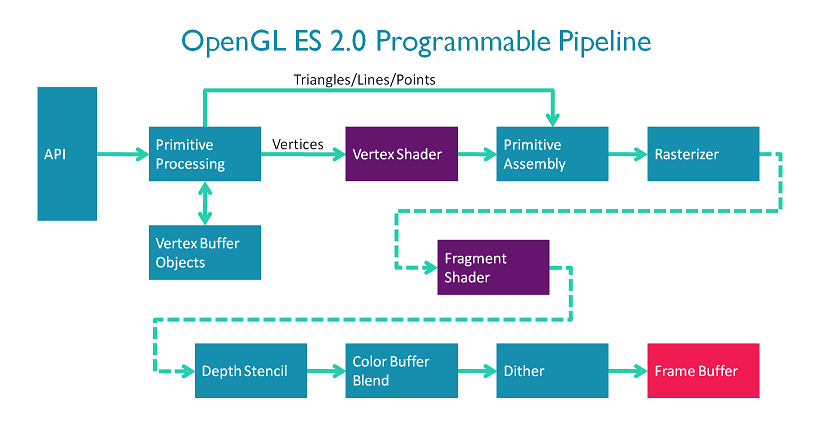
The vertex and fragment stages are the programmable stages in the OpenGL ES 2.0.
The code you write in the vertex shader will be run once per vertex. So if you tell OpenGL ES to draw ten unconnected triangles, your vertex shader will run 30 times.
The only required job of the vertex shader is to emit the final position of the vertex.
In a very trivial (and useless) example, your vertex shader could simply set the position of each vertex to (0, 0, 0). This doesn't require any data to be passed in to the shader. The #version 100 here tells OpenGL ES that we are using version 1 of the OpenGL ES Shader Language.
More normally, you would pass in the coordinates of the shapes you want to draw and use these as your positions. For this you need to pass in some data for each vertex you want to draw. This type of per vertex data is handled in OpenGL ES using vertex attributes.
If you want to draw a single triangle, you need three vertices. Let's say (1.0, 0.0, 0.0), (0.0, 1.0, 0.0), and (-1.0, 0.0, 0.0).
To get this data in, we can pass the array [1.0, 0.0, 0.0, 0.0, 1.0, 0.0, -1.0, 0.0, 0.0] to OpenGL ES and associate it with a 3-component attribute (e.g. a vec3). When you tell OpenGL ES you want to draw a single triangle, it will split up the array and pass each 3-component position to a different vertex shader.
We can then use this data to set the position of the vertex in the vertex shader.
Great, we can now pass data in to a vertex shader and set a sensible position. The nice thing is, that we can use these same techniques to pass in any data we want to be different per vertex. So if we want to have a colour associated with each vertex we can do that too.
Now you're thinking what good is a colour in the vertex shader if the only thing I can output is a vertex position. Well, it turns out you can also create arbitrary outputs from a vertex shader which will be interpolated across the shape you are drawing. These are called varyings. The varyings you output must exactly match the varyings you specify as inputs to the fragment shader.
There are two stages in our pipeline diagram in between the vertex and fragment stages: primitive assembly and rasterization. Since all modern display technologies are raster based (they can display only coloured points), we need some way to turn our concept of points and triangles into points on the screen. The rasterization step does this part for us, working out which primitives cover which points and then generating fragment jobs for those points. As it generates the fragment job it calculates the interpolated values for our varyings using something called barycentric coordinates. We won't go into the details here but in the example below, on the left side we have a triangle with red, green, and blue specified as the colour attributes for the three vertices. On the right the colours have been interpolated across the triangle.
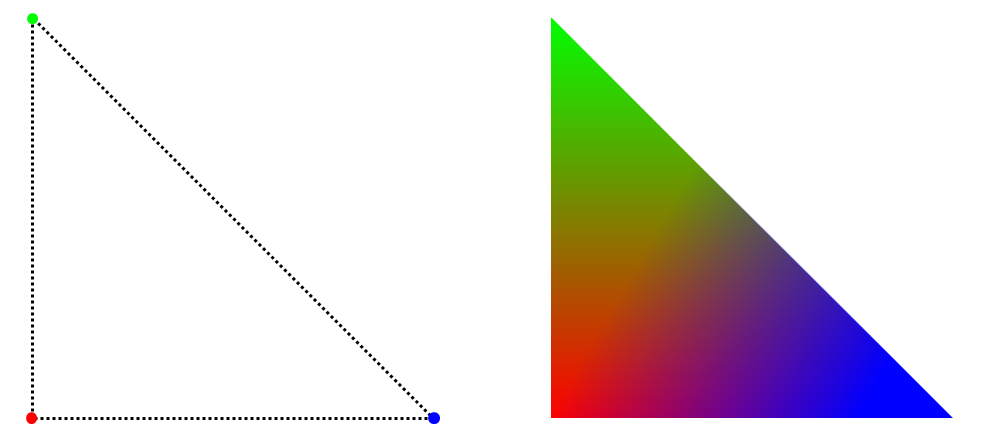
That's an easy to visualise example using colours, but this technique works for all kinds of things.
This leads us nicely onto the fragment shader. The fragment shader is run (you guessed it!) once per fragment issued by the rasterizer.
The only output a fragment shader needs to emit is the colour of the fragment. So to give another trivial example we could just set the colour of every fragment to black: (0.0, 0.0, 0.0, 1.0).
But that's no fun.
So since we've passed some interpolated colours from the vertex shader, we can use those here.
So to recap so far we've covered:
What about constant data? What if we have some data which is common to all vertices, or to all fragments or to everything?
This could be anything from a time value to something describing the level of light in the scene.
A very common use for this would be having a transformation matrix which positions you vertices in a scene. You need the same matrix for each vertex so that they all get transformed together.
For this constant type of data we have shader uniforms. For the most part declaring, setting and using uniforms is the same as attributes except that you only set one set of values.
For example:
More differences between attributes and uniforms are listed in Appendix: Attributes vs. Uniforms.
There's one last type of data that we could need, per-fragment data that is not interpolated from per-vertex data. For example, what if we want to display an image on a triangle. We can't use uniforms since we don't typically have enough to store all the pixels in an image(not to mention that setting and accessing the data would be awful). We also can't use attributes and varyings since those are per-vertex and then interpolated which doesn't make sense for an image. Luckily for us OpenGL ES has this covered too. For this purpose we use textures.
Textures allow us to specify arbitrary arrays of data which can be accessed in the fragment shader.
How does each fragment shader instance know where to look in the texture? Good question, but we already have all the knowledge we need to solve this problem. If we specify where in the image each vertex maps to (using an attribute), the rasterizer will interpolate the coordinates nicely for us to give us a per-fragment varying. This coordinate can then be used to look up the correct point in the image. This is done using a texture sampler.
We've focused on very trivial examples here just to expose the data flows in OpenGL ES. It might not have sold you on why you would want this, or why should you care. Well, this is really only the ground layer. OpenGL ES shaders also allow you do general purpose maths (including lots of hardware accelerated built-in functions). This fact, combined with the data flows we've already covered gives you the ability to harness the power of a massively parallel computing unit: the GPU.
Because of the flexibility afforded to you by the OpenGL ES 2.0 API you're free to implement whatever graphical effects you can imagine. Almost all high-end 3D graphics applications (e.g. games) will be using the basic methods described above; using shaders to achieve their effects.
So in summary we have seen the OpenGL ES programmable pipeline and introduced the two shader types available in OpenGL ES 2.0: vertex and fragment shaders.
Vertex shaders have the following interface:
Fragment shaders have the following interface:
This was a very quick introduction to shaders and the programmable pipeline in OpenGL ES. Don't worry if you didn't quite catch all the details (we haven't really begun to scratch the surface here). The following tutorials go into far more detail and use practical examples (with working source code) to further explain these concepts.
Now move on to Graphics Setup.
Some further differences between uniforms and attributes for reference:
Accessibility:
Type of data:
Object model:
Availability:
glGet(...) with the appropriate parameter (found in brackets below).glGet(...). Some relavent ones for this introduction are:
