 |
OpenGL ES SDK for Android
ARM Developer Center
|
|
OpenGL ES SDK for Android
ARM Developer Center
|
This sample presents the GL_OVR_multiview and GL_OVR_multiview2 extensions and how they can be used to improve performance for virtual reality use cases.
Multiview rendering allows draw calls to render to several layers of an array texture simultaneously. The vertex shader can know what layer it is writing to, so that the rendering results can be different for each layer. This can be very useful for virtual reality applications where rendering the same scene from two different positions is necessary.
Virtual reality applications need to render all their scenes twice from different view angles in order to create the illusion of depth. Doing this by simply rendering everything twice with different view and perspective matrices is not optimal, as it requires setting up a mostly identical draw call multiple times. The GL_OVR_multiview extension adresses this issue by allowing one draw call to render to multiple texture layers of an array texture, removing the overhead of setting up multiple draw calls. The vertex and fragment shaders are then invoked once for each texture layer in the attached array texture, and have access to the variable gl_ViewID_OVR which can be used to select view dependent input for each layer. Using this mechanism, an array of view and projection matrices can be used instead of a single matrix, and the shader can choose the right matrix for each layer using gl_ViewID_OVR, allowing one draw call to render from multiple eye positions with little overhead. Rendering to multiple layers with only one draw call can also potentially be done using layered geometry shaders, but this presents a much larger overhead compared to using the multiview extension as geometry shaders are very demanding on performance and multiview is a fixed function solution which allows many internal optimizations compared to geometry shaders.
Before using the extension, one should check that it is available, this can be done with the following code, which looks for the GL_OVR_multiview extension. Similar code can be used for checking for the GL_OVR_multiview2 or GL_OVR_multiview_multisampled_render_to_texture extensions if needed.
It is however possible that the glFramebufferTextureMultiviewOVR function is not available in your GL headers even though the extension is supported. If this is the case, eglGetProc can be used to access the function as showed in the following code.
If this call is successful, the glFramebufferTextureMultiviewOVR can be used as a normal gl function.
The following code sets up a framebuffer object for rendering to multiview. Both the color attachment and the depth attachment are array textures with 2 layers, and both these layers will be rendered to by every draw call used on this framebuffer object. It is important that all attachments have the same number of layers as the framebuffer will not be complete otherwise. The framebuffer object has to be bound to the GL_DRAW_FRAMEBUFFER as otherwise the glFramebufferTextureMultiviewOVR call will give an INVALID_OPERATION error. It is also important that the number of views set up for the framebuffer object matches the number of views declared in the current shader program when drawing, as otherwise the draw call will give an INVALID_OPERATION error. The next section will show how to create a shader program that can be used for multiview rendering.
The following code shows shaders used for multiview rendering. Only the vertex shader contains multiview specific code. It enables the GL_OVR_multiview extension and sets the num_views variable in the layout to 2. This number needs to be the same as the number of views attached to the framebuffer using glFramebufferTextureMultiviewOVR. The shader takes in an array of view projection matrices (view and projection matrices multiplied together), instead of just one, and selects the matrix to use by indexing with gl_ViewID_OVR which gives the index of the current texture layer being rendered to. This allows us to have different camera positions and projections for the different layers, making it possible to render from both eye positions in a VR application with one draw call. There is only one model matrix is this case as the model does not move for the different layers. Only the gl_Position is affected by the gl_ViewID_OVR value in this case, meaning this shader only requires the GL_OVR_multiview extension and not the GL_OVR_multiview2 extension. In order to also change the normal based on gl_ViewID_OVR (or other vertex outputs) the GL_OVR_multiview2 would be required.
The program can be set up in the same way as any other program. The viewProjection matrices must be set up as a matrix array uniform as in the following code. In this example the projection matrices are the same, but for VR one would normally use different projection matrices for each eye. The example later in this tutorial will render to more than 2 layers, and will use different perspective matrices per layer, which is the reason for there being more than one perspective matrix here. The camera positions in this case are set at -1.5 and 1.5 in the x direction, both looking at the center of the scene.
Anything rendered with this program while the multiview framebuffer object is bound will be rendered to both texture layers from different view angles without having to do do multiple draw calls. Having rendered your VR scene to separate layers for each eye, the results now need to be rendered to the screen. This is easily done by binding the texture and rendering with it as a 2D array texture. For a VR application, two viewports can be set up, and for each viewport the relevant texture layer is rendered to the screen. This can be a simple blitting of the texture to the screen, or it can do filtering or other post processing operations on the texture before displaying it. As the texture is an array, the texture sampling operation needs a vec3 texture coordinate, where the last coordinate indexes into the array. In order for each draw call to choose different layers, a uniform with the layer index can be provided as in the following fragment shader.
A VR technique that can easily be achieved using multiview rendering is rendering with a higher resolution in the center of each eye's view, with gradually lower resolution further away from the center. Eyes are capable of observing higher resolutions in the center of their view, and this can therefore give better visual results than rendering the entire scene in one resolution. This can be achieved using the multiview extension by rendering to more than one texture layer per eye with different fields-of-view, and blending the resulting layers. One texture layer can be rendered to using a projection matrix giving a wide field of view, rendering the entire scene. Another texture layer can be rendered to using a narrower field of view, so that it only renders the center of the screen, where the eye will be able to see a higher resolution image. As each layer has the same dimensions, the layer with the narrow field of view will be a much higher resolution version of the center of the scene. These two layers can then be blended together to create an image with varying resolution. This method can also give a performance boost, as the FBO can use half the resolution while still getting the same dpi in the center of the screen. Even though you are rendering 4 layers instead of 2, this still cuts the total number of pixels in half. This technique also combines well with barrel distortion warping, which is a common virtual reality technique for making the virtual reality image look correct through a lens. The barrel distortion warping makes objects closer to the center of the viewport larger than objects in the edges. Combined with a varying resolution, this can give a higher resolution for the enlarged objects and a lower resolution for the objects that are made smaller by the barrel distortion warping.
To implement the varying resolution, we first set up a multiview framebuffer object in the same way as shown before, only with 4 layers instead of 2 as there are 2 layers per eye:
The shaders for rendering the scene are also the same except that the vertex shader specifies num_views to be 4 rather than 2, and takes in arrays of length 4 instead of 2 for the matrices:
The following code then sets up the projection and view matrices for rendering the scene 4 times. The first two perspective matrices use a 90 degree field of view, rendering the entire scene for each eye. This will be used as the low resolution texture when creating the final image. The next two perspective matrices use a 53.13 degree field of view, as this gives a near plane that is exactly half the size of the 90 degree matrices (tan(53.13/2) * 2 == tan(90/2)). This will be used as the high resolution image. Making the high resolution near plane exactly half the size of the low resolution near plane makes interpolating between the images simpler, as the texture coordinates for the low resolution image can go from 0 to 1, while the texture coordinates for the high resolution image go from -0.5 to 1.5. The high resolution image will then only be sampled in the middle half of the screen, and its contents will match the content of the low resolution texture at the same screen coordinates, only with a higher resolution.
Every draw call using the shader and matrix setup shown above will render to all 4 layers of the framebuffer object using the different view and projection matrices. The resulting images will then be blended to the screen to create a varying resolution image for each eye using the following shaders.
A viewport for each eye is created, and for each viewport this shader program is used to draw a full screen textured quad. There are different texture coordinates for the high resolution and low resolution images, as the high resolution image should be drawn at half the size of the low resolution image and centered in the middle of the screen. This is achieved by the following texture coordinates:
The layerIndex used to select the texture array layer is set up in the same way as in the earlier example, but the shader will sample both the layer at layerIndex and the one at layerIndex + 2, as the last 2 layers in the array texture contain the high resolution images. The sampled colors are then interpolated based on the distance to the middle of the screen. The shader calculates the squared distance to the middle of the screen rather than the actual distance as this removes the need for doing a square root operation. This works as long as the limits used in the smoothstep call are adjusted accordingly, which gives no extra work as these are constant values.
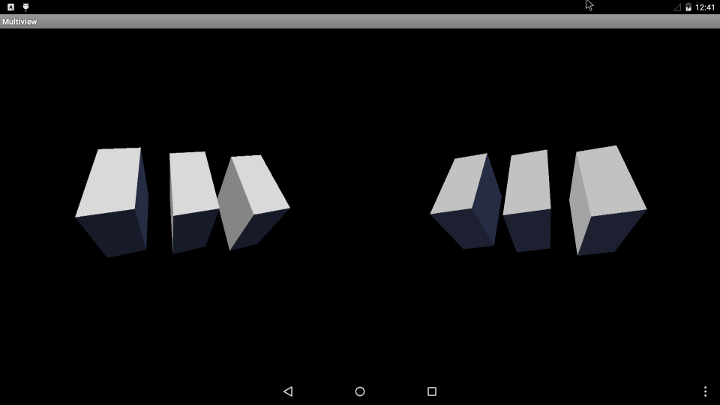
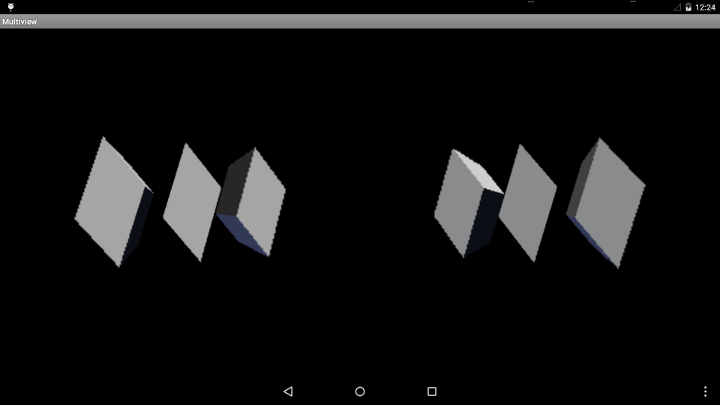
After drawing a full screen quad using this shader for each eye viewport, the high and low resolution images have been blended to give higher resolution in the center of the image where the eye is focused, with the resolution gradually decreasing further away from the center, where the eye is not focusing. The image in the introduction shows the result, where 3 rotating cubes have been drawn from each eye, and the center of each eye's viewport gets a higher resolution than the rest of the screen. The following image is a lower resolution version of the same scene, making it easier to see how the resolution increases towards the center of each eye's viewport.
This technique can also be used to create a movable focal point, i.e. for directing the viewer's focus towards a certain part of the scene. To do this, the camera for the high resolution image would have to be moved around to capture different parts of the scene, and the texture coordinates used when blending would have to be adjusted accordingly.
[1] http://www.khronos.org/registry/gles/extensions/OVR/multiview.txt
[2] http://www.khronos.org/registry/gles/extensions/OVR/multiview2.txt

