|
Network Component
MDK Middleware for IPv4 and IPv6 Networking
|

|
|
Network Component
MDK Middleware for IPv4 and IPv6 Networking
|
|
Many networking applications can be built with the Network Middleware Component. The following examples demonstrate the usage of the most popular services in the component.
Download these examples using the , select the related Board and Copy the example to your working directory.
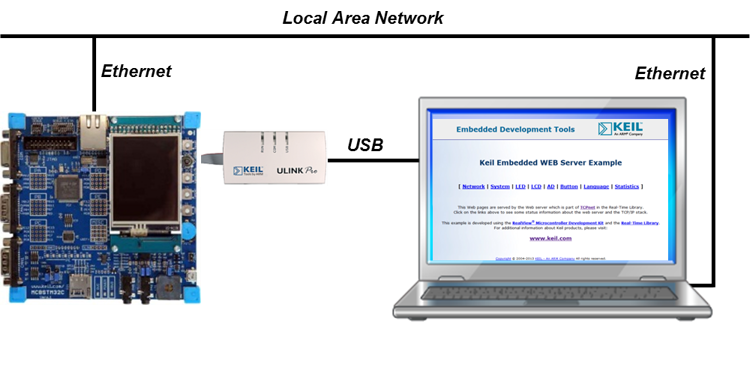
The HTTP Server example uses a fixed set of web pages stored in ROM, but is capable of exchanging information with the underlying hardware by using the CGI interface. The following picture shows an exemplary connection of the development board and a Computer.
The Abstract.txt file contained in the Documentation group of the Project window gives you more information on the general setup and the available I/O of the development board.
Open the example project in MDK (the web page explains how to do this). The µVision Project window should display a similar project structure:

HTTP_Server.c contains the main C function that initializes the board hardware and the Network Component.Web.c is a compiled file that will be generated by the tool from all the web input files.HTTP_Server_Multiuser.c file can be added using the feature. This file is used for specifying multiple users and access rights for these users.HTTP_Server_Access.c file enables the server to accept or block connection requests from certain remote clients.HTTP_Server_Error.c contains the information that the web server is showing in case of errors (such as Error 404).You may now build and download the example project to the evaluation board using the µVision commands:
After these steps, the project should start executing on your evaluation kit. In case of errors, refer to the Evaluation Board User's Guide for configuration information. If you want to know how the file converter works that is required to compile the web pages into a single C file, please visit the page.
The setup of the Evaluation Board hardware is described in the Abstract.txt file.
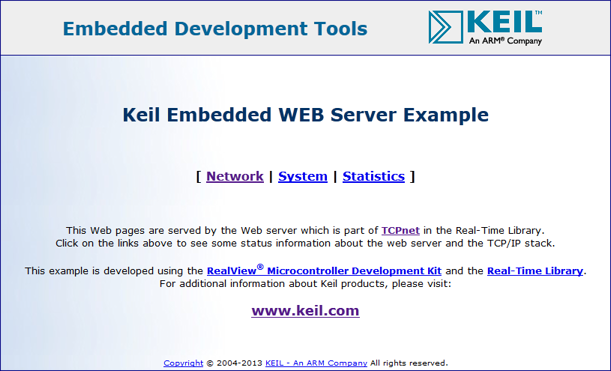
The web server can be tested on any PC using any browser available. Simply, type in the Local Host Name that is defined in the Net_Config.h file. The default name is my_host. If you have a DCHP server in your network, you will be automatically connected. You need to log in. As for all network examples, use "admin" (without the quotes) for the user and no password (you can change the defaults in the Net_Config_HTTP_Server.h file). The following (or a similar) page will come up in your browser:
If you get an error message, please verify that all network, IP and other settings are correct.
The HTTPS Server example uses a fixed set of web pages stored in ROM, but is capable of exchanging information with the underlying hardware by using the CGI interface. The HTTPS server uses the ARM mbed TLS software component to enable Secure Communication. The following picture shows an exemplary connection of the development board and a Computer.
The Abstract.txt file contained in the Documentation group of the Project window gives you more information on the general setup and the available I/O of the development board.
Open the example project in MDK (the web page explains how to do this). The µVision Project window should display a similar project structure:
HTTP_Server.c contains the main C function that initializes the board hardware and the Network Component.Web.c is a compiled file that will be generated by the tool from all the web input files.HTTP_Server_Multiuser.c file can be added using the feature. This file is used for specifying multiple users and access rights for these users.HTTP_Server_Access.c file enables the server to accept or block connection requests from certain remote clients.HTTP_Server_Error.c contains the information that the web server is showing in case of errors (such as Error 404).Net_Security.c in the Network group contains the certificate for secure communication. If you want to change the default certificate, refer to Creating your own certificates and keys.You may now build and download the example project to the evaluation board using the µVision commands:
After these steps, the project should start executing on your evaluation kit. In case of errors, refer to the Evaluation Board User's Guide for configuration information. If you want to know how the file converter works that is required to compile the web pages into a single C file, please visit the page.
The setup of the Evaluation Board hardware is described in the Abstract.txt file.
The web server can be tested on any PC using any browser available. Simply, type in the Local Host Name that is defined in the Net_Config.h file. The default name is my_host. If you have a DCHP server in your network, you will be automatically connected. You need to log in. As for all network examples, use "admin" (without the quotes) for the user and no password (you can change the defaults in the Net_Config_HTTP_Server.h file). The following (or a similar) page will come up in your browser:
If you get an error message, please verify that all network, IP and other settings are correct.
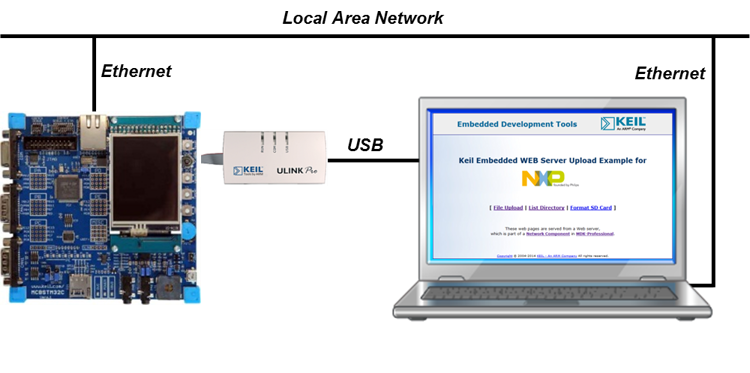
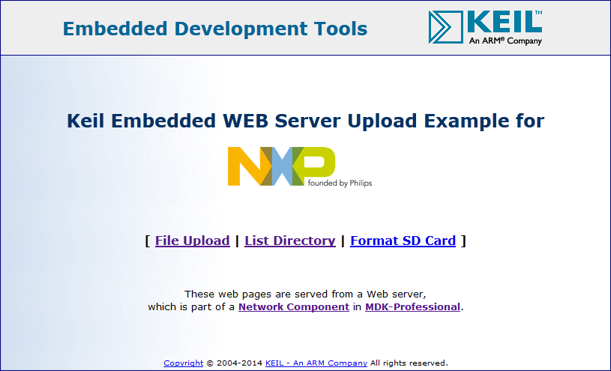
The HTTP Upload example gives a web based interface to the SD card that is attached to a development board. The user is able to list the contents of the memory card and to upload files to it. The following picture shows an exemplary connection of the development board and a Computer.
The Abstract.txt file contained in the Documentation group of the Project window gives you more information on the general setup and the available I/O of the development board.
Open the example project in MDK (the web page explains how to do this). The µVision Project window should display a similar project structure:

HTTP_Upload.c contains the main C function that initializes the board hardware and the Network Component.Web.c is a compiled file that will be generated by the tool from all the web input files.You may now build and download the example project to the evaluation board using the µVision commands:
After these steps, the project should start executing on your evaluation kit. In case of errors, refer to the Evaluation Board User's Guide for configuration information.
The setup of the Evaluation Board hardware is described in the Abstract.txt file.
The web server can be tested on any PC using any browser available. Simply, type in the Local Host Name that is defined in the Net_Config.h file. If you have a DCHP server in your network, you will be automatically connected. You need to log in. As for all network examples, use "admin" (without the quotes) for the user and no password (you can change the defaults in the Net_Config_HTTP_Server.h file). The following (or a similar) page will come up in your browser:
If you get an error message, please verify that all network, IP and other settings are correct.
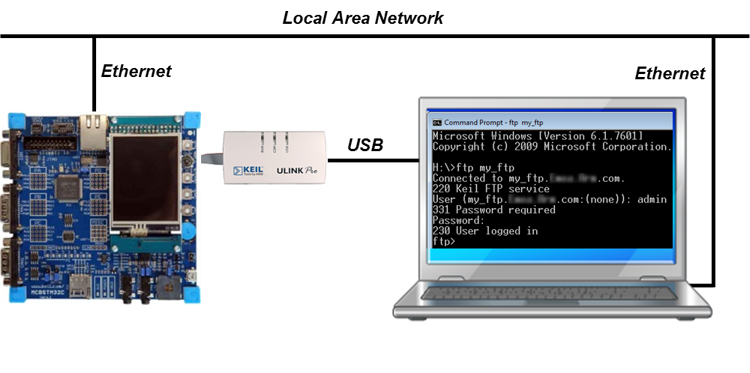
This tutorial creates a FTP server that allows you to manage files from any machine using a FTP client. The following picture shows an exemplary connection of the development board and a Computer.
Open the example project in MDK (the web page explains how to do this). The µVision Project window should display a similar project structure:

FTP_Server.c contains the main C function that initializes the board hardware and the Network Component.FTP_Server_Multiuser.c file can be added using the feature. This file is used for specifying multiple users and access rights for these users.FTP_Server_Access.c file enables the server to accept or block connection requests from certain remote clients.FTP_Server_Event.c contains a routine that notifies the user application about certain events happening on the FTP server (such as file/directory manipulation events).You may now build and download the example project to the evaluation board using the µVision commands:
After these steps, the project should start executing on your evaluation kit. In case of errors, refer to the Evaluation Board User's Guide for configuration information.
The setup of the Evaluation Board hardware is described in the Abstract.txt file.
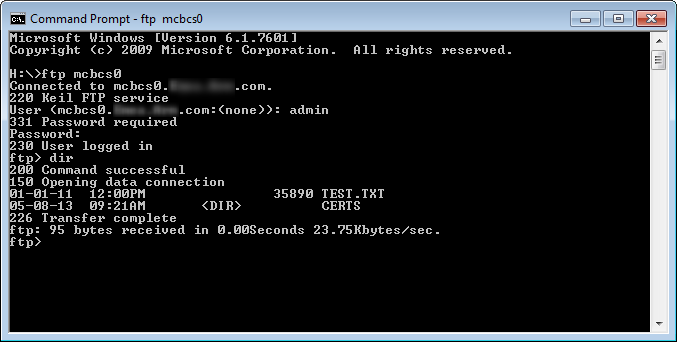
To connect to the FTP server, all you need is a FTP client. On a Windows PC you can use the Command Prompt. Simply type ftp my_host (or the respective hostname that you have chosen in the Net_Config.h file). If you have a DCHP server in your network, it will automatically connect to the FTP server. You will be asked for a username and password combination. As for all network examples, this is "admin" (without the quotes) for the user and no password (you can change the defaults in the Net_Config_FTP_Server.h file). After a successful log in, you should see something like this:
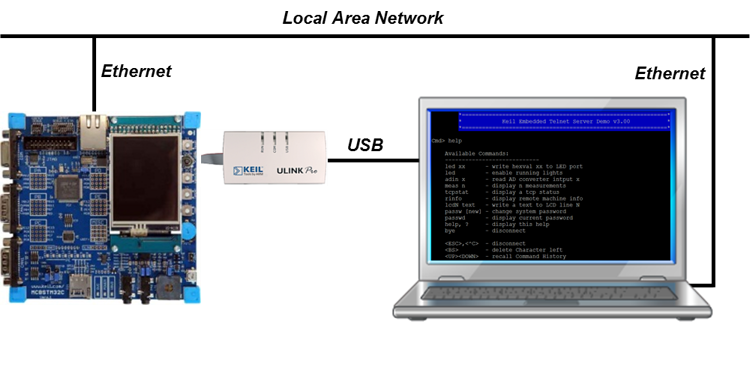
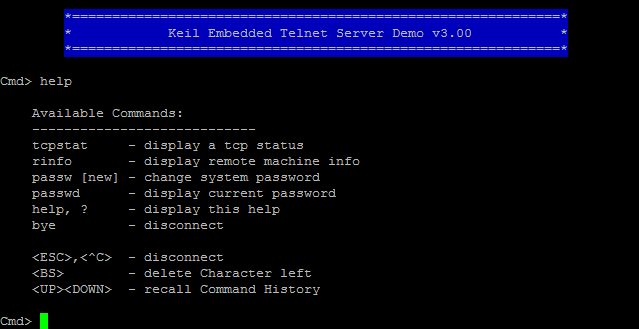
Often, it is necessary to have a Command Line Interface (CLI) for interaction with the device. This example shows how to use the Telnet server for this purpose. The following picture shows an exemplary connection of the development board and a Computer.
Open the example project in MDK (the web page explains how to do this). The µVision Project window should display a similar project structure:

Telnet_Server.c contains the main C function that initializes the board hardware and the Network Component.Telnet_Server_Multiuser.c file can be added using the feature. This file is used for specifying multiple users and access rights for these users.Telnet_Server_Access.c file enables the server to accept or block connection requests from certain remote clients.You may now build and download the example project to the evaluation board using the µVision commands:
After these steps, the project should start executing on your evaluation kit. In case of errors, refer to the Evaluation Board User's Guide for configuration information.
The setup of the Evaluation Board hardware is described in the Abstract.txt file.
For opening a Telnet session, you need a Telnet client. As this is not an integral part of Windows any more, please look for an alternative on the Internet. PuTTY has a good feature set and is easy to install and use. When you connect to your board using a Telnet client, please enter my_host (or the respective hostname that you have chosen in the Net_Config.h file) in the hostname field and use the standard Telnet port 23. You will be asked for log-in credentials. Like for all other tutorials, the default is admin for the username without any password (you can change the defaults in the Net_Config_Telnet_Server.h file). Using the help command, you can see the list of available CLI commands:
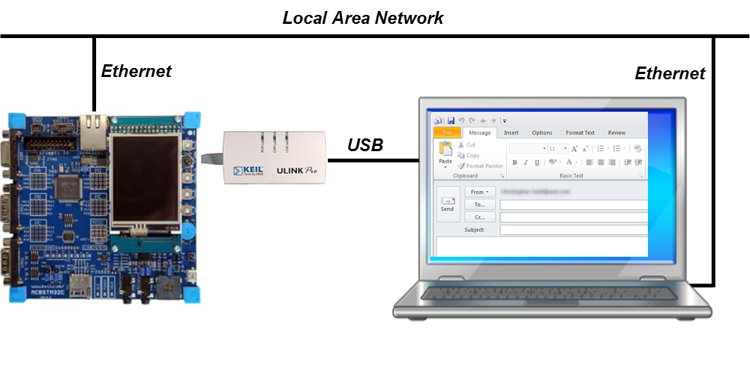
SMTP is used for sending e-mail notifications from an embedded system to various recipients. This example shows how to setup a SMTP client for this purpose. The following picture shows an exemplary connection of the development board and a Computer.
Open the example project in MDK (the web page explains how to do this). The µVision Project window should display a similar project structure:

SMTP_Client.c contains the main C function that initializes the board hardware, the Network Component and provides the IP address of SMTP server.You may now build and download the example project to the evaluation board using the µVision commands:
After these steps, the project should start executing on your evaluation kit. In case of errors, refer to the Evaluation Board User's Guide for configuration information.
The setup of the Evaluation Board hardware is described in the Abstract.txt file.
If you have entered your personal e-mail address as the recipient's address, you only need to open your mail program and check your inbox.
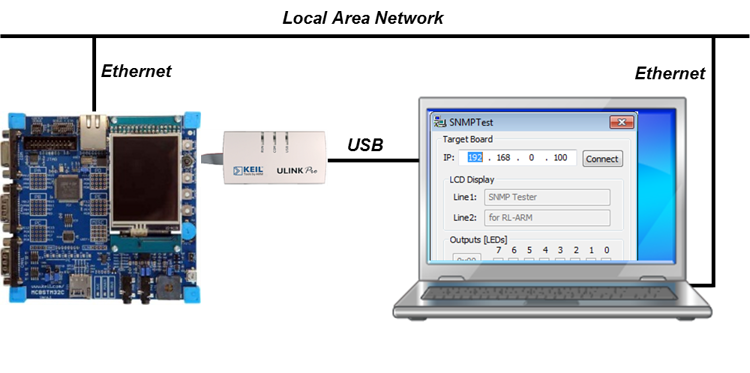
The Simple Network Management Protocol (SNMP) is mainly used in network management systems to monitor network-attached devices for conditions that warrant administrative attention. It is the most popular network management protocol in the TCP/IP protocol suite. The SNMP Agent example shows how to use SNMP to control an embedded system. The following picture shows an exemplary connection of the development board and a Computer.
Open the example project in MDK (the web page explains how to do this). The µVision Project window should display a similar project structure:

SNMP_Agent.c contains the main C function that initializes the board hardware and the Network Component.You may now build and download the example project to the evaluation board using the µVision commands:
After these steps, the project should start executing on your evaluation kit. In case of errors, refer to the Evaluation Board User's Guide for configuration information.
The setup of the Evaluation Board hardware is described in the Abstract.txt file.
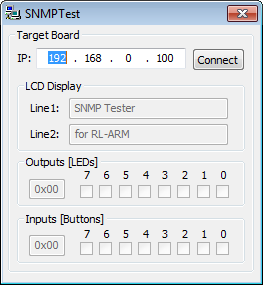
To test this example, run the Windows application 'SNMPTest.exe' from C:\Keil\ARM\Utilities\SNMPTest\Release and type in the IP address of your Embedded SNMP Agent and click 'Connect'. When connected, you can change the LCD text on the target, control the on-board LED diodes and monitor the state of on-board push-buttons.
BSD sockets are often used for network communication as they are providing a well-defined API for exchanging data over the network. In general, they are relying on TCP and UDP socket communication. The BSD server and client examples are used to demonstrate BSD compliant communication. To make it work, you need to setup two development boards within the same network: a BSD server and a BSD client. An exemplary setup could look like this:
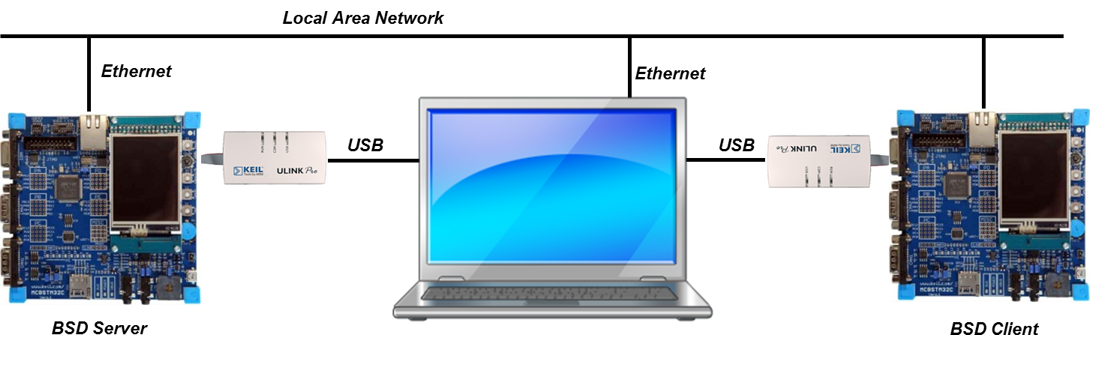
Open the two example projects in MDK (the web page explains how to do this). The µVision Project window should display a similar project structure:

BSD_Client.c contains the main C function that initializes the board hardware and the Network Component for the BSD client. It also contains the actual code that is used to communicate with the BSD server.BSD_Server.c contains the main C function that initializes the board hardware and the Network Component for the BSD server. The server is waiting for a connection from a BSD client.You may now build and download the example projects to the evaluation boards using the µVision commands:
After these steps, the projects should start executing on your evaluation kit. In case of errors, refer to the Evaluation Board User's Guide for configuration information.
The setup of the Evaluation Board hardware is described in the Abstract.txt file.
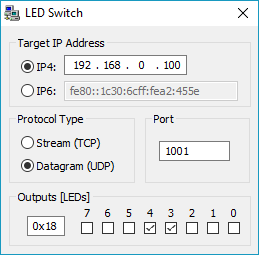
To test the BSD Server example stand-alone, run the Windows application 'LEDSwitch.exe' from C:\Keil\ARM\Utilities\LEDSwitch\Release and type in the IP address of your development board (IPv4 and IPv6 addresses are accepted). When connected, you can control the on-board LEDs.